
WeatherBot - 3D Printable Weather Forecasting Theatre
How to build your own Weather Forecasting Theatre with ESP32
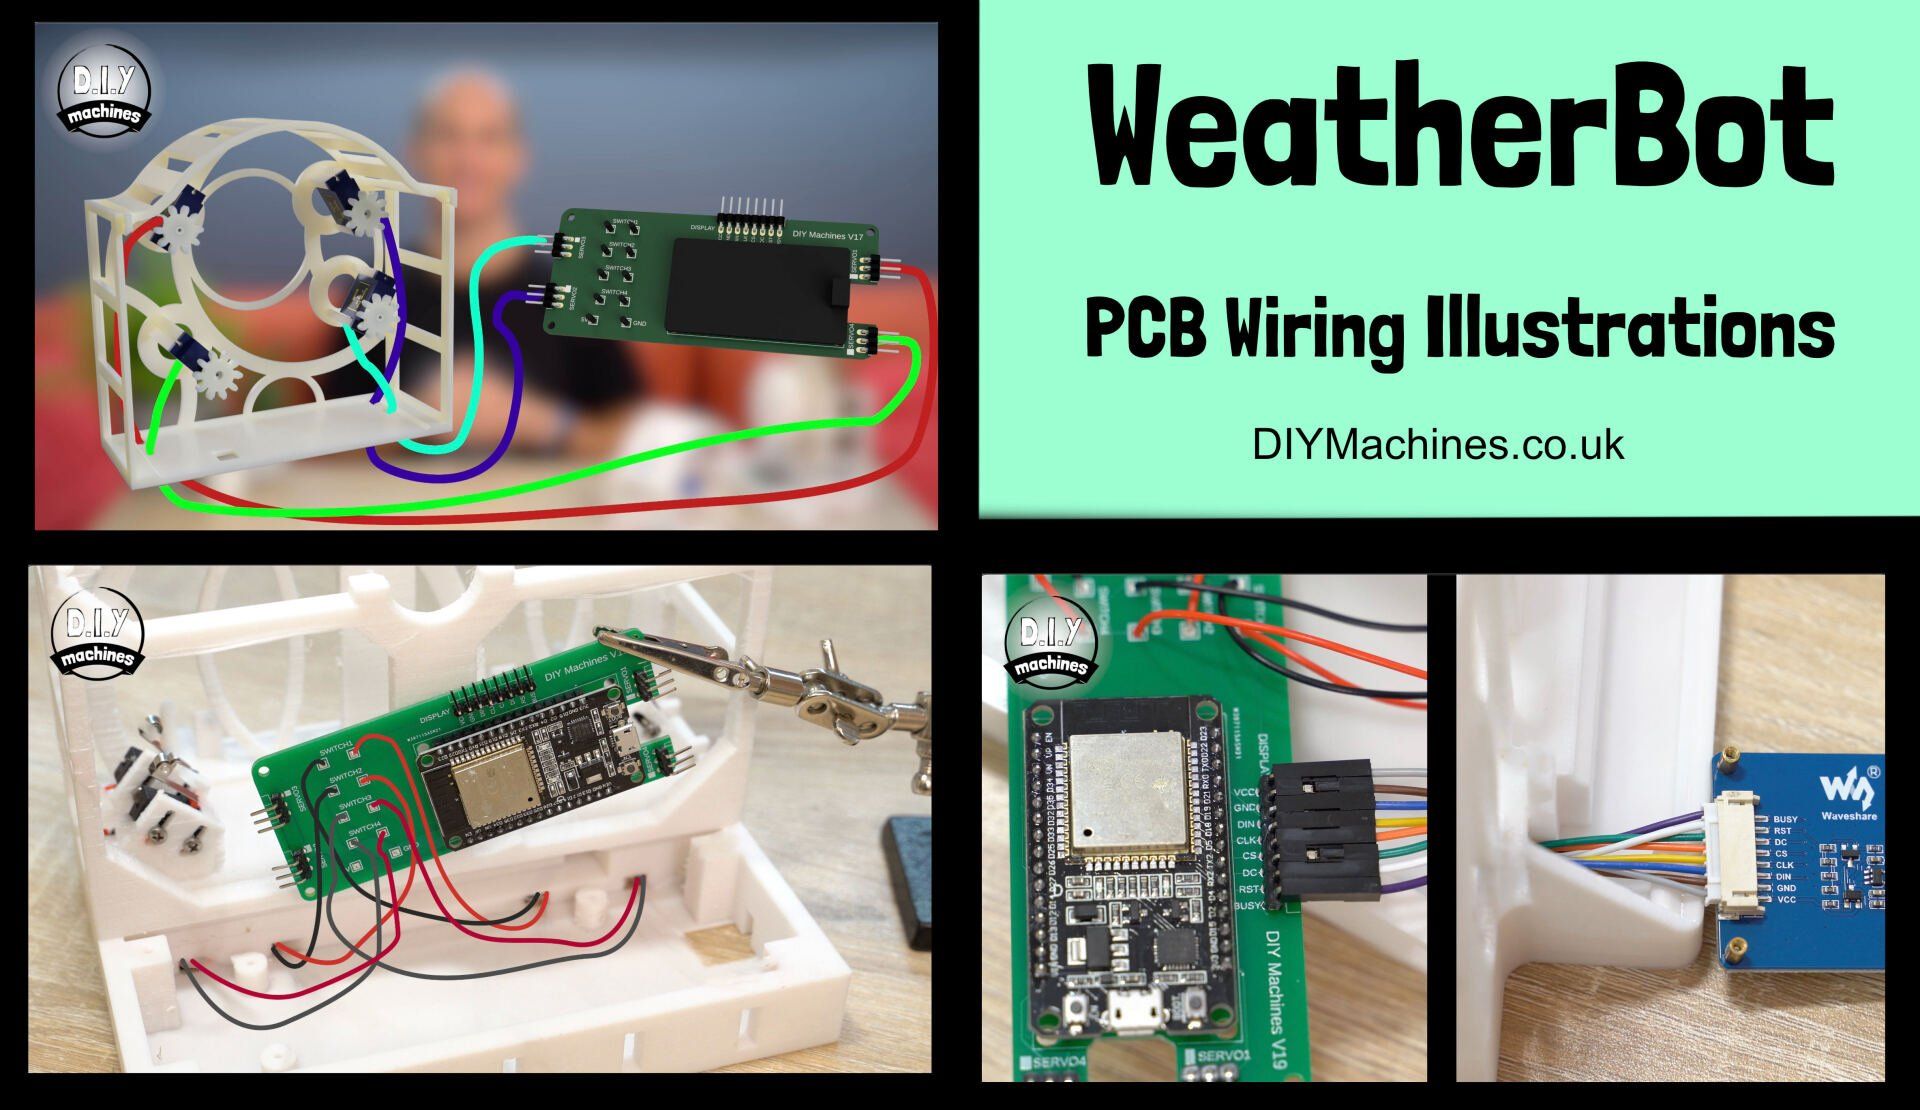
Meet WeatherBot, my WiFi connected weather forecasting machine. WeatherBot retrieves a local forecast from OpenWeatherMaps and then shows you tomorrows weather with a motorised mini diorama.
The additional e-ink display provides a more precise insight into both today and tomorrows weather patterns. I’ll show you step by step how to make your own.
I’ll share with you how I made the project and some more about how it works in the video above.
As always there is a complete list of parts and links to Amazon / Aliexpress down further below. You will also find a helpful tips, software installation instructions and an FAQ here on my site. Enjoy.


Downloads:
3D models for printing: https://www.prusaprinters.org/prints/107501-weatherbot-3d-printable-weather-forecasting-theatr
Code for WeatherBot project: https://github.com/DIY-Machines/WeatherBot
Instructions for programming are further down this page.
List of items used in this project and where to find them / BOM:
(As an Amazon Associate I earn from qualifying purchases.)
- Waveshare 2.9” E-ink Display (296x128): https://geni.us/E-inkDisplay1
- Electrical wire: https://geni.us/22AWGWire
- ESP32 (x1): https://geni.us/ESP32
- Limit Switches (x4): https://geni.us/ContactSwitch
- Micro continuous / 360 degree rotation servos (x4): https://geni.us/FS90R
- PCB: - https://geni.us/GeoLeafPCB
- USB cable (for uploading code and powering project): https://geni.us/MicroUSBCable
- Some nuts and bolts (detailed list below) https://geni.us/M2-5BoltKit
- 90 Degree / Corner Header Pins: https://geni.us/90DegreeHeaderPins
- Filament for 3D printing: https://geni.us/3DJake
- 3mm thick wood for laser cut scene discs (x4 A4 size): https://geni.us/3mmPlywoo
- Projects PCB:
https://geni.us/WeatherBotPCB
Nuts, bolts and screws needed:
- M2.5x14 Bolts (x12)
- M2.5x8 Bolts (x7)
- M2.5 Nuts (x10)
Wiring Diagram:
Without PCB:

With PCB:
Programming your WeatherBot
The code for the project can be downloaded from GitHub: https://github.com/DIY-Machines/WeatherBot
I am finishing writing out the full instructions for this - it should be completed by 10th January 2022. Thank you for your patience.
There is a few changes you will need to make to the code downloaded from GitHub before uploading it to your WeatherBot. I'll guide you through them now step-by-step. This involves:
- Downloading Arduino IDE
- Adding an additional board manager and installing ESP32 boards
- Installing required libraries in the Arduino IDE
- Creating your own free account on OpenWeatherMaps
- Retrieving your own personal API key
- Entering your longitude and latitude
- Setting your desired ranges for weather
- Entering your own WiFi credentials
You may not need to complete all of the above steps - for example you may already have the Arduino IDE installed on your PC.
Downloading the Arduino IDE
The Arduino IDE is free software used for writing and uploading code to microcontroller boards. You can download it from the Arduino website here: https://www.arduino.cc/en/software
Download the appropriate version for your computer, either Windows, Linux or Mac and then follow the respective installers instructions.
Adding an additional Board Manager and Installing ESP32 Boards
Board managers allow us to add support for additional boards to the Arduino IDE. Before we can install the ESP32 boards we need to tell the Arduino IDE where it can find and download additional software.
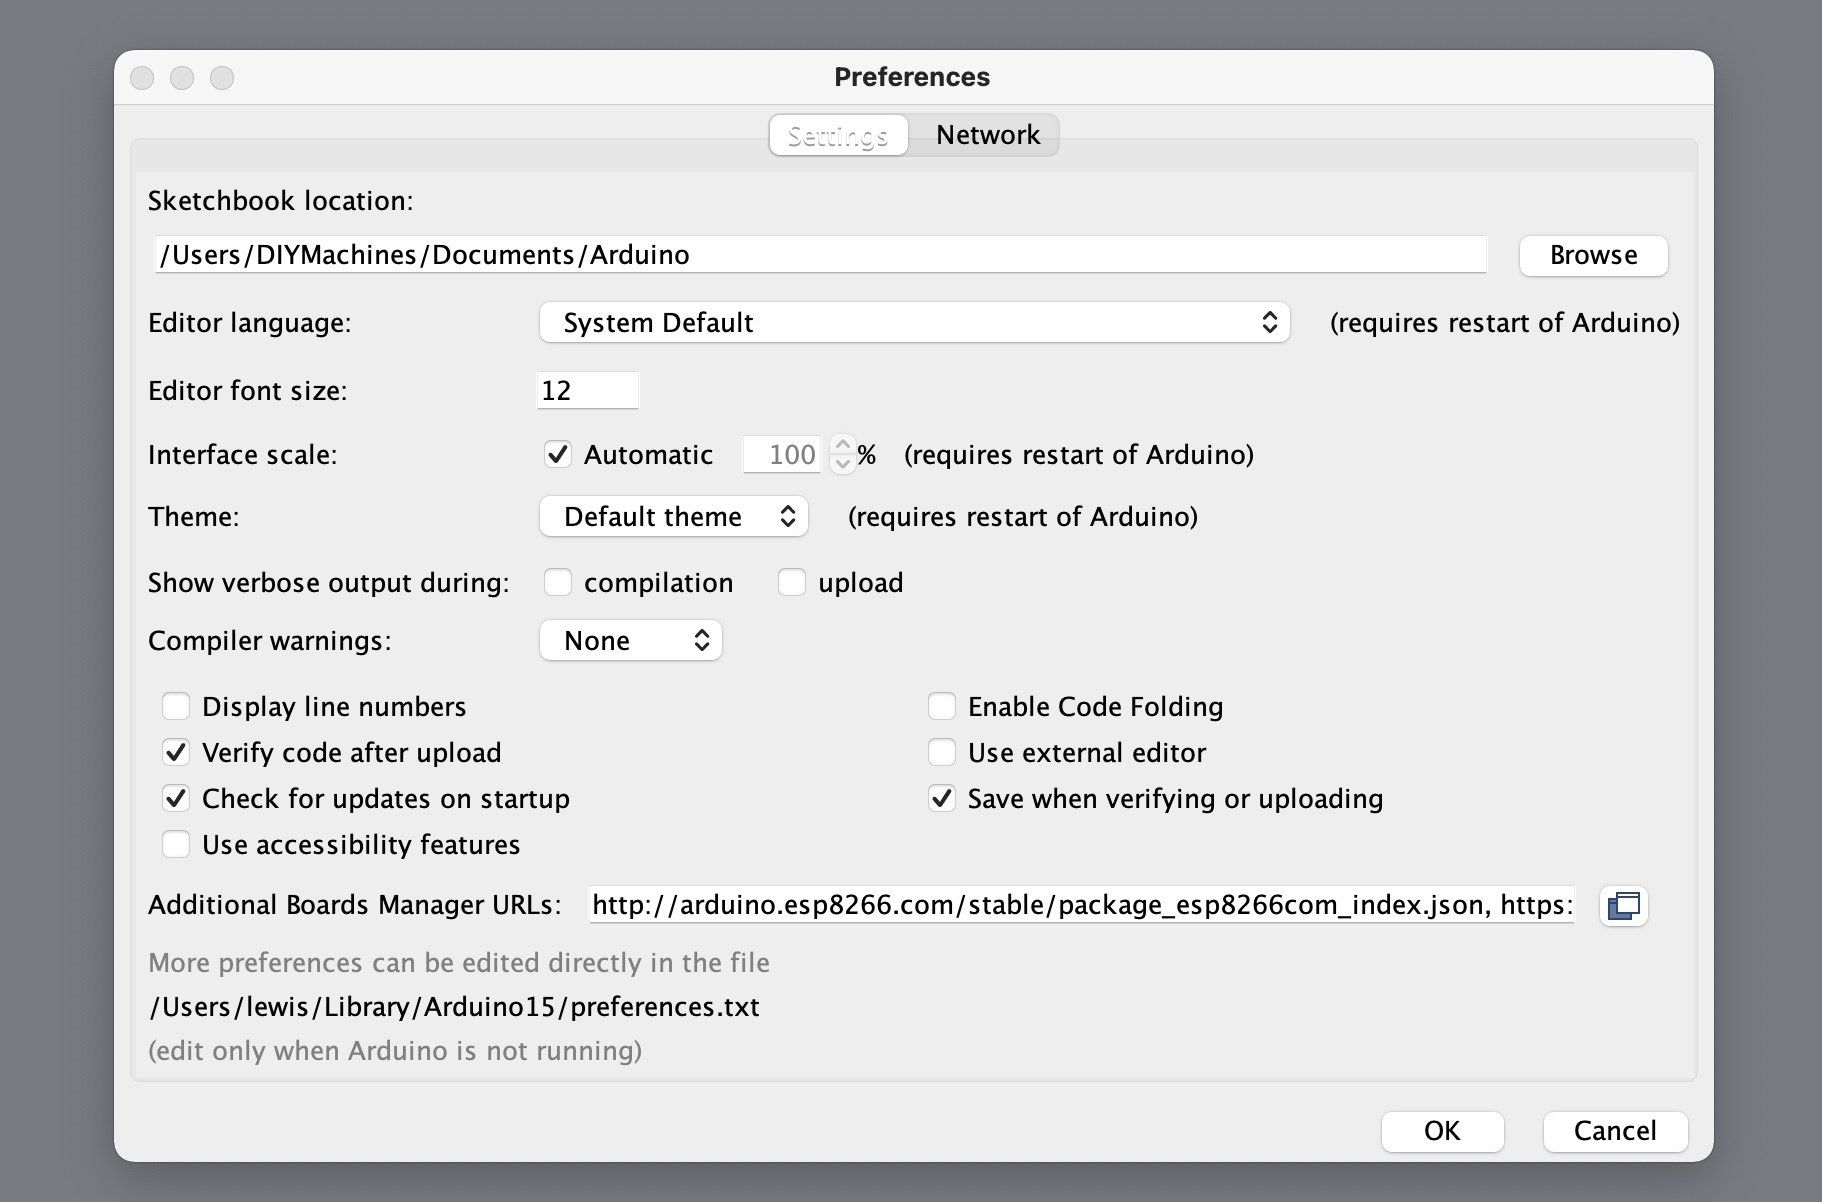
- On a Windows computer head to File > Preferences and on a Mac go to Arduino > Preferences.
- In the window that opens we need to add
https://dl.espressif.com/dl/package_esp32_index.json into the box for 'Additional Board Manager URLs. If it's their already you won't need to add it a second time. If their is a different URL there already then simply add a coma and then the URL we need.
Now that our IDE knows where to fetch a list of new boards we can open the Board Manager itself and install the ESP32 board.
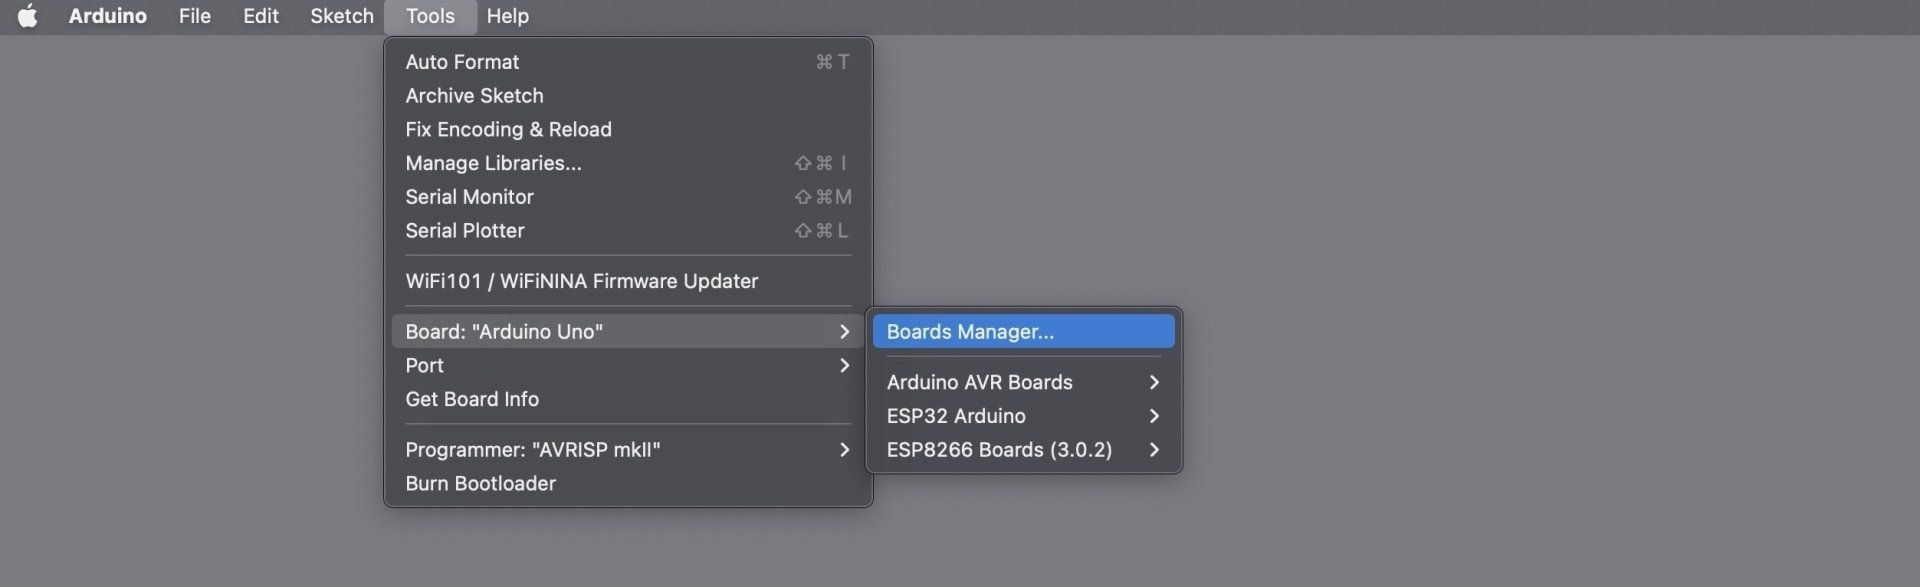
On both Windows and Mac open the Board Manager by going to Tools > Board > Boards Manager.
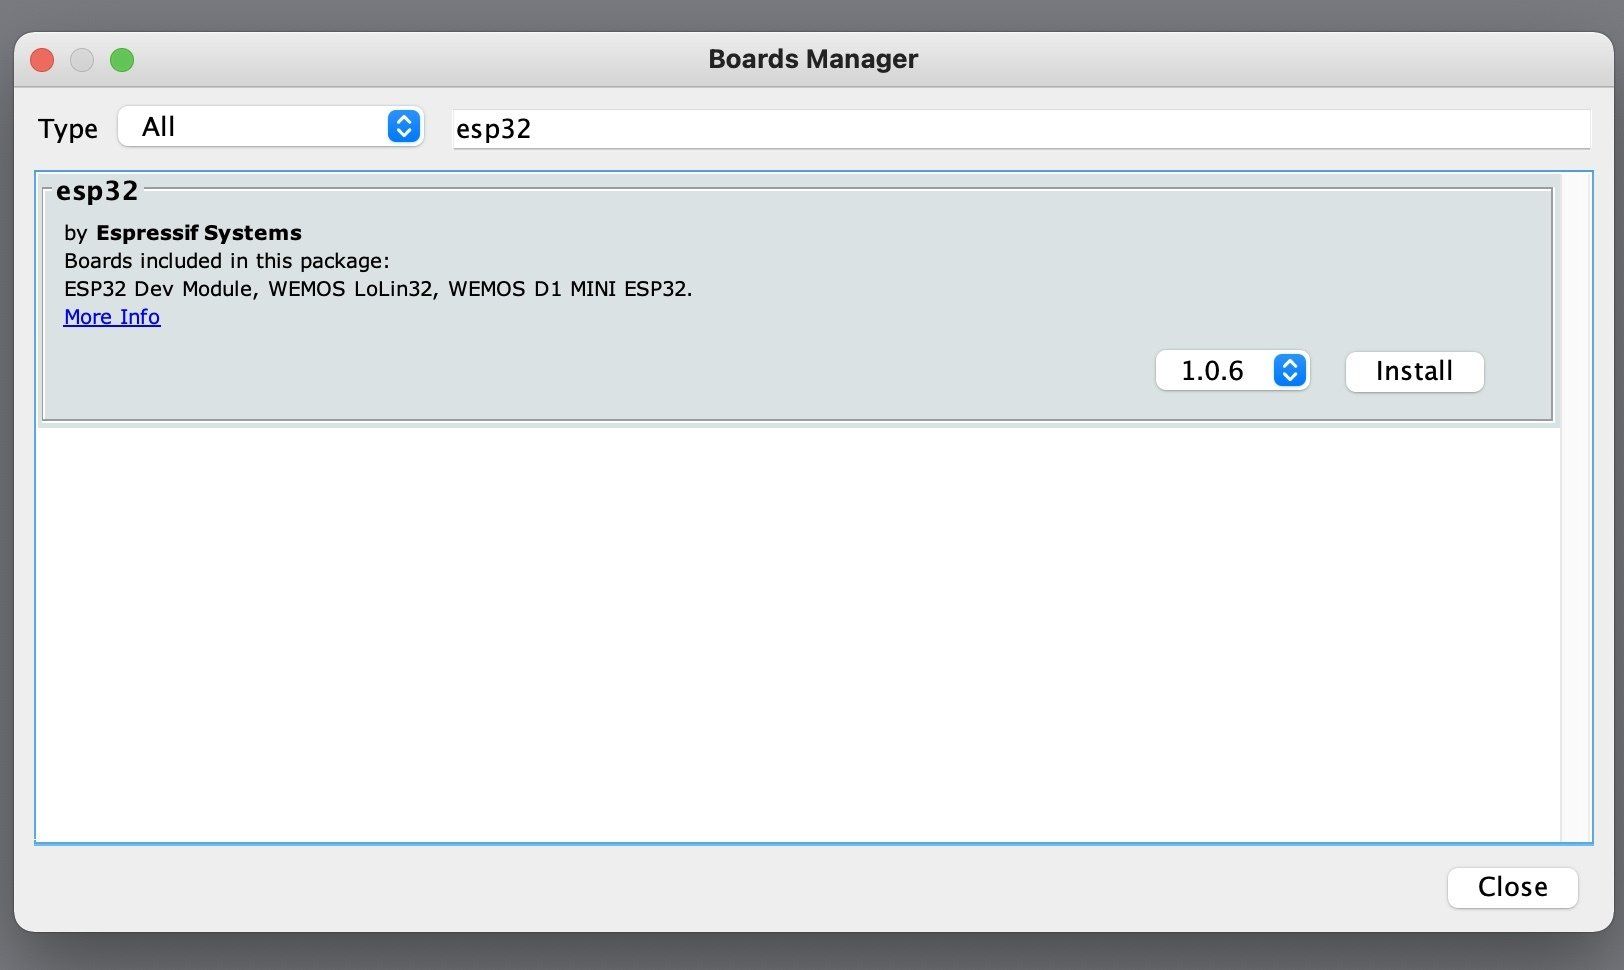
Seach for 'ESP32'. Select the ESP32 by Espressif System options and press its install button.
That's the ESP32 boards successfully added to your Arduino IDE. Next up, installing libraries....
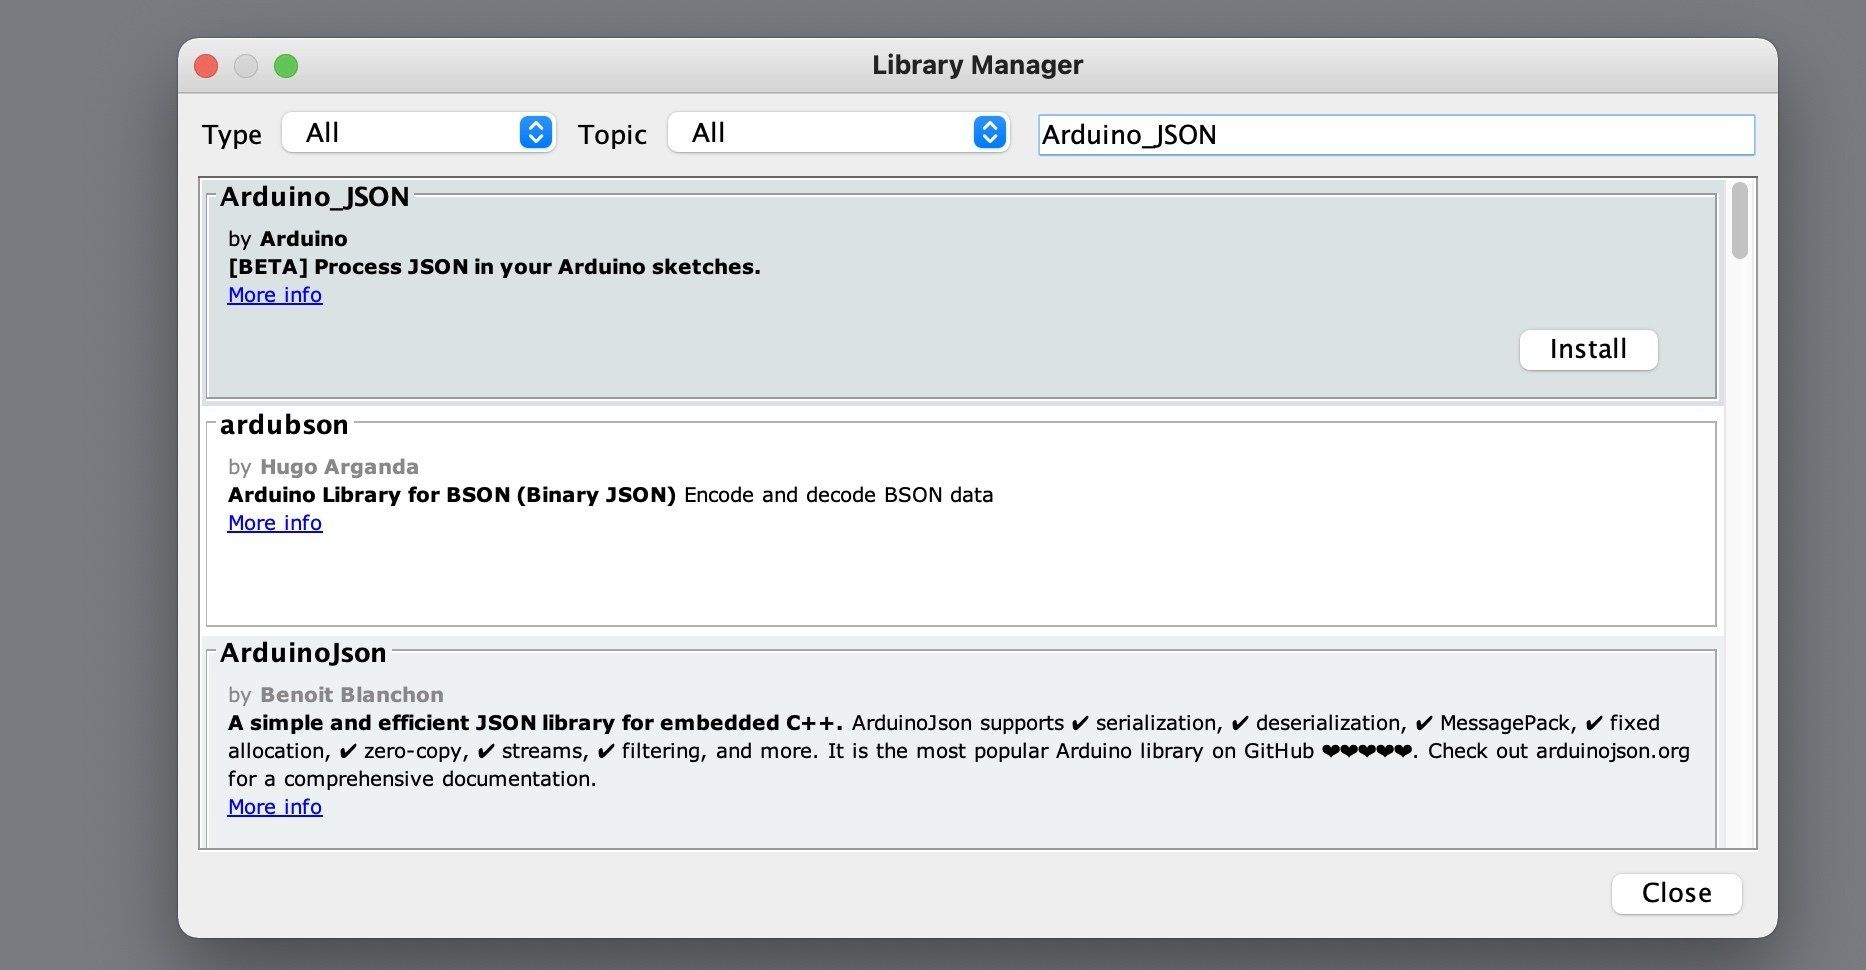
Installing required libraries
Libraries are useful collections of pre-existing code which can quickly and easily add additional functionality to your programmes. There are a few which I have chosen to help develop this project. They are:
- Arduino_JSON by Arduino
- Adafruit GFX by Adafruit
- GxEPD2 by Jean-Marc Zingg
- ESP32Servo by Kevin Harrington and John K. Bennett
To install a library we need to head to
Tools > Manage libraries.
From this pop-up window we can use the search to find and install each of the above libraries. Search for their respective names in the box at the top and then press 'Install' in a similar fashion to what we did whilst installing the Boards during the previous step.
Once done you can close the window.
Download and open the projects code in the Arduino IDE
The code for this project is hosted on GitHub. Head to the project repository: https://github.com/DIY-Machines/WeatherBot
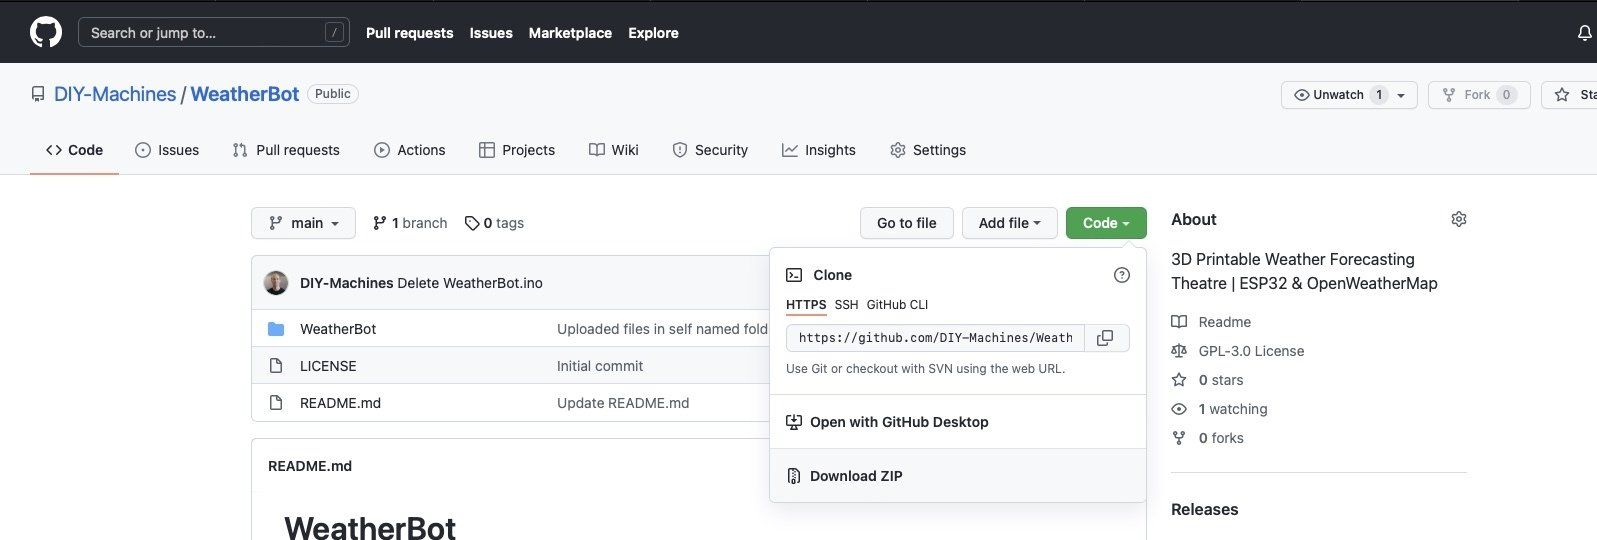
From the project page you click 'Code' and then 'Download Zip' to download the code to your computer. Open the folder which was download, followed by the 'WeatherBot' folder and then open the file 'WeatherBot.ino' in the Arduino IDE. This should also pull in the other files as tabs along the top of the IDE.

Create your own free OpenWeatherMaps account
Head on over to the sign up page at OpenWeatherMap and create yourself a free account: https://home.openweathermap.org/users/sign_up
Create your unique API key for the project
Once your account has been created you can log in to the OpenWeatherMap site again, click on your username in the top right and then 'My API Keys'
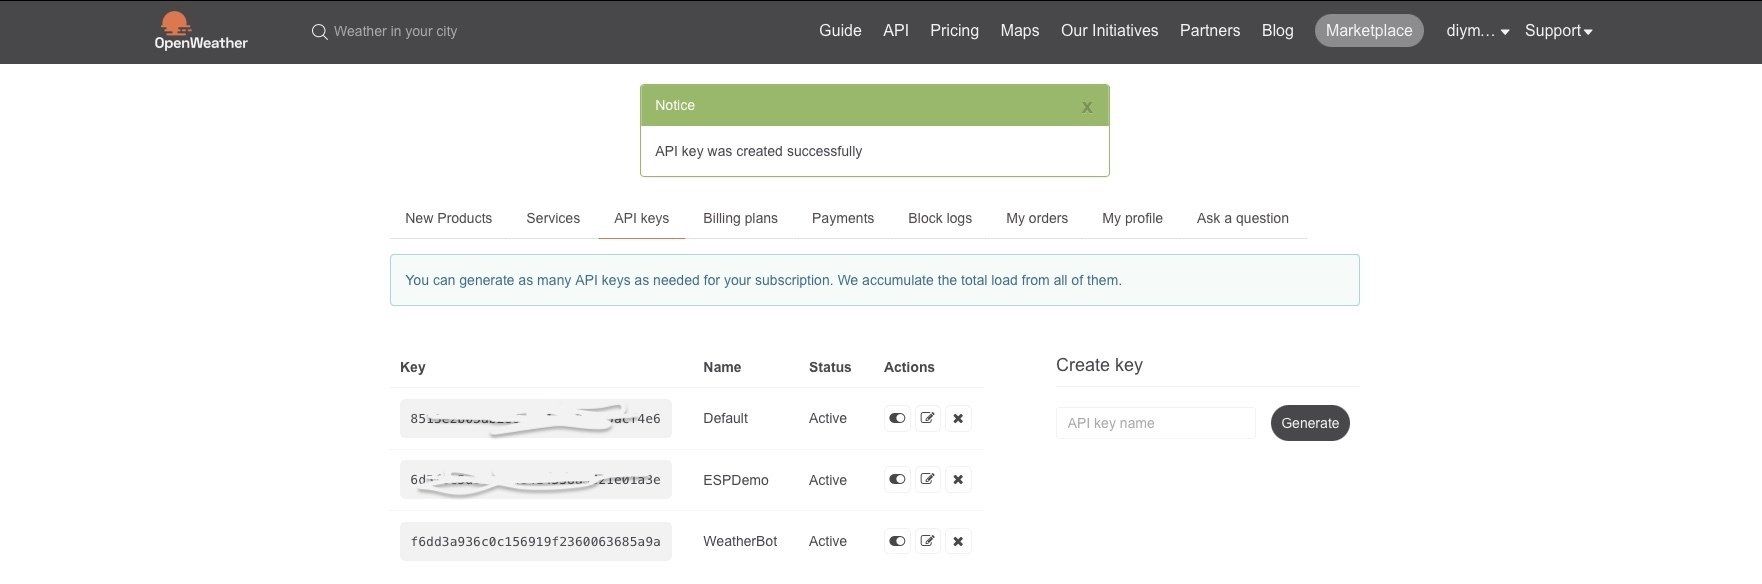
Type a name for the key which we are about to generate into the box on the right and then press 'Generate'. I chose to call my WeatherBot. You should then take a note of the long Key it has generated for you. We will be adding this into the code in a few more steps before uploading it to your machine.
Finding your Longitude and Latitude
We let OpenWeatherMap know where we want to lookup a weather forecast for by passing them a longitude and attitude when we request the data. Head over to https://www.distancesfrom.com/Latitude-Longitude.aspx and use the tool on the page to find the longitude and attitude for the location whos weather you would like to monitor on your WeatherBot.
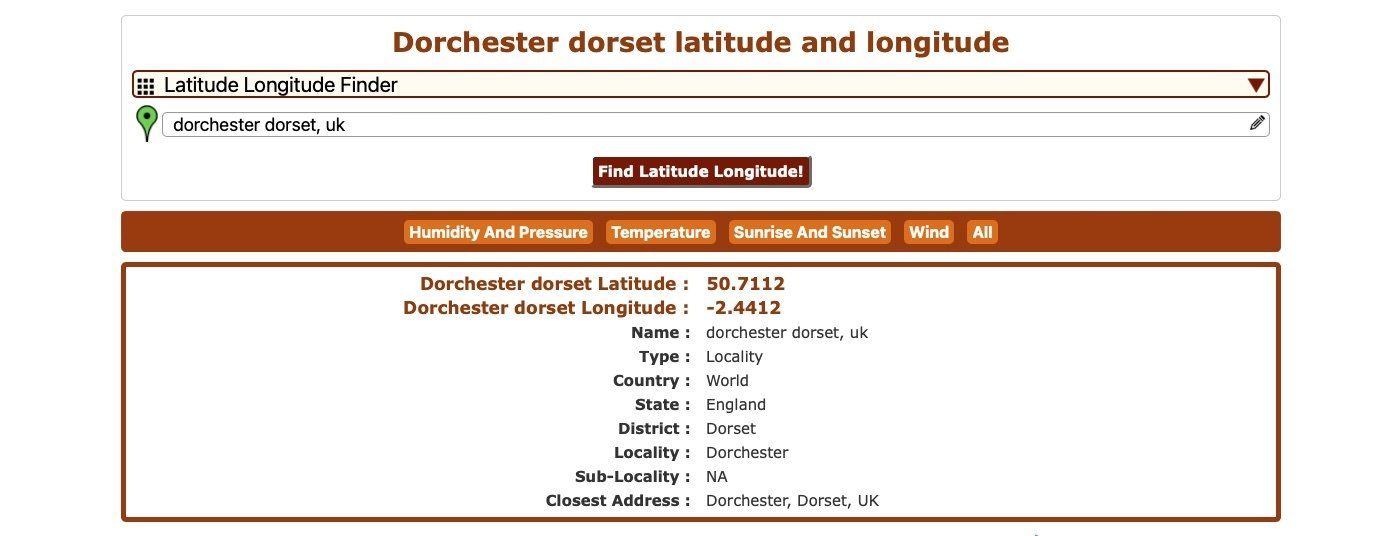
It does not need to be where the WeatherBot itself is going to be. Note the location data down along with the API key from earlier.
Updating the code
The first part we can update is the SSID and Wifi password. This should be for the wireless network the WeatherBot will be connecting to in order to retrieve weather updates from the internet.
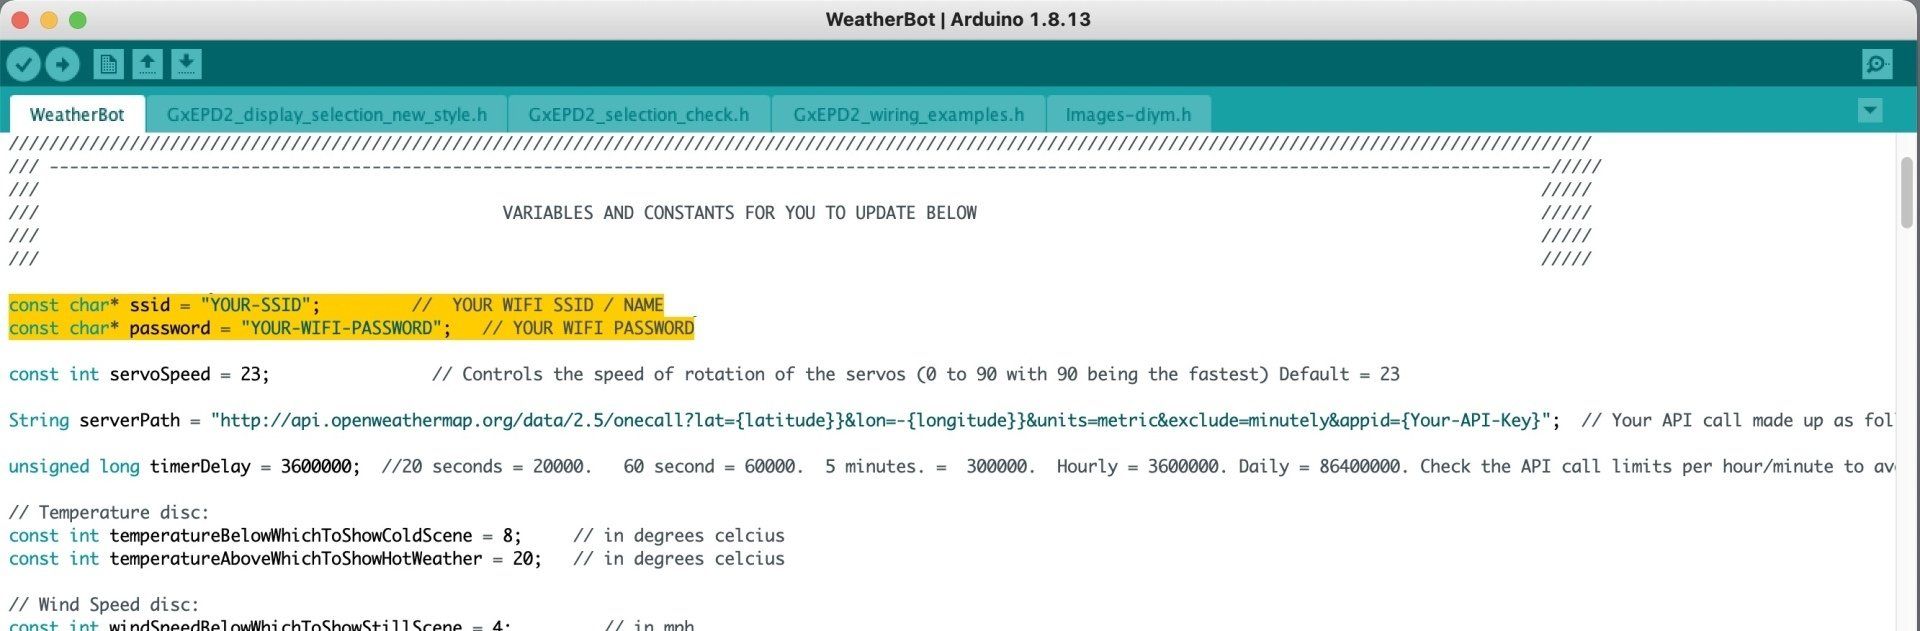
Lines #22 and #23 have placeholders where you should enter your Wifi credentials in place of "YOUR-SSID" and "YOUR-WIFI-PASSWORD". The speech marks ("") should remain around your own SSID and Password.
We make the weather data request by calling a URL with our specific API key, longitude, and latitude in it. We also include our unique API key which authorises or request and allows them to track how many requests we are making and how quickly.
At the time of writing this they currently allow 60 calls/minute with a maximum of 1,000,000 calls/month. More than frequent enough for our projects need.
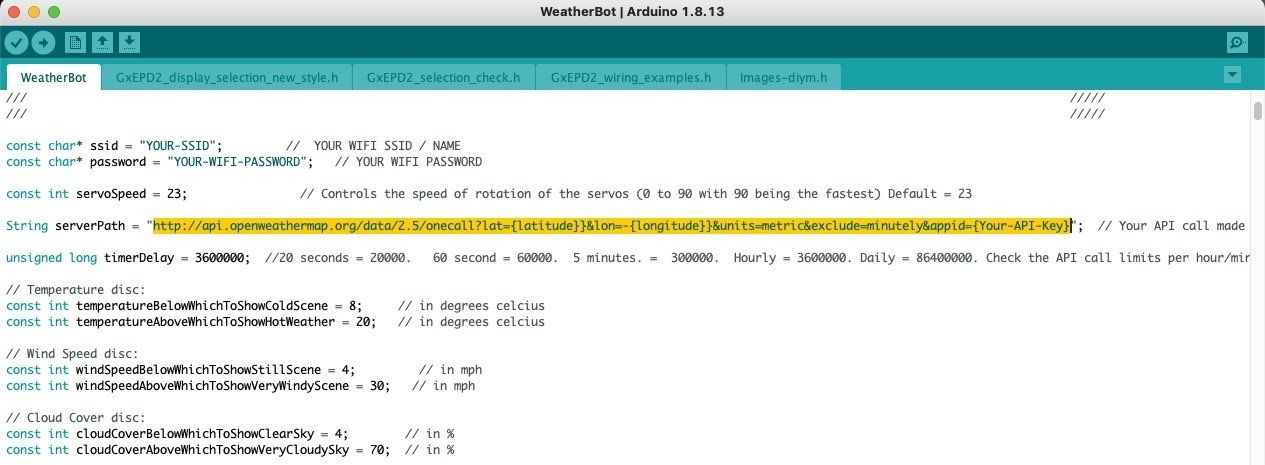
Line #27 is where we store this URL / server path. The structure of it looks like:
http://api.openweathermap.org/data/2.5/onecall?lat={latitude}&lon=-{longitude}&units=metric&exclude=minutely&appid={Your-API-Key}
You need to replace the {latitude}, {longitude} and {Your-API-Key} sections with the values you noted down earlier. For example if mine were:
- API Key = f6dd3a936c3c156919f2364063685a9a
- Longitude = -2.4412
- Latitude = 50.7112
Then my URL / server path on line #27 would like this (all as one line):
http://api.openweathermap.org/data/2.5/onecall?lat=50.7112&lon=--2.4412&units=metric&exclude=minutely&appid=f6dd3a936c3c156919f2364063685a9a
Further down the code for the project their is a section which contains eight constant integers (lines #32 through to #45 - shown below) which determine how the WeatherBot interprets the weather and translates it to the pictorial form shown with the scene discs.

I've set the ranges based on how I feel with the weather in the UK, but this will likely need tweaking based on where you are based and how you personally find the weather. For example, 20°C is hot weather in my opinion here in the UK but elsewhere (such as Orlando, USA) 26°C may be more suitable.
The comments against each line in the code will give you guidance as to the unit of measurement used.
Uploading the Code to the ESP32
We can now connect our computer to the USB cable already connected to the ESP32 module. Then in the Arduino IDE select port and board type.
At the time of designing the WeatherBot and writing this tutorial there is a bug in the way the code is compiled for the ESP32 which prevents the e-ink display from functioning as intended. We can work around this by selecting the board type LOLIN D32.
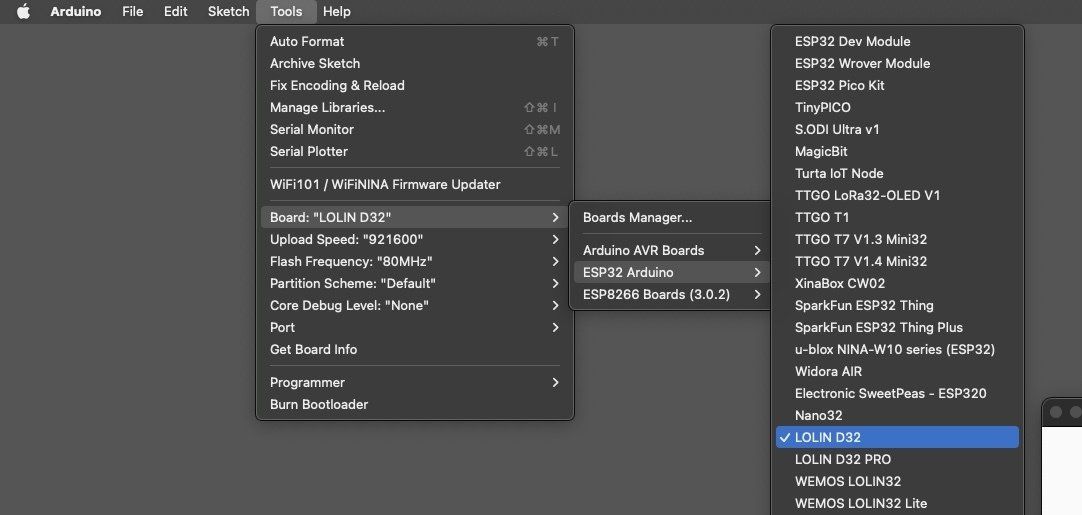
You can then compile and upload the code to your WeatherBot. Don't forget to press the physical 'BOOT' button on the project itself whilst the Arduino IDE tries to connect after compiling the code.
Comments


