How to Build a Smart Magic Mirror
Build your own Super Smart Magic Mirror
I’m Lewis, and this is DIY Machines. The channel where I show you step-by-step how to build your own awesome projects. Today we’re going to make ourselves a high-tech magic mirror featuring customisable modules, presence sensors, built in dimmable lighting, and an (optional) attitude problem….
Each morning when I wake up I check my phones calendar, followed by the weather app followed by the news and more. I can end up reading in bed for 30 minutes when I’m supposed to be getting ready or worse yet just accidentally fall asleep again.
So this is my solution, move all this information to a digital smart mirror and leave my phone out of the bedroom. Now when I rise I swing my legs outta bed and stumble to the kitchen, checking in on my mirror before pouring myself that cup of ambition.
All this is powered by a wifi connected Raspberry Pi and some free open source software. I included a recessed PIR motion sensor which tells the monitor to sleep when no one is present to save on power consumption. (We've all got to do our bit).
I’ve also embedded this simple touch button on the front of the mirror that allows us to easily toggle the lights on and off as well as adjust their brightness with a longer press.
You’ll find a huge list of 3rd party modules you can add to your own mirror, from train departures, Spotify 'now playing' information, to live wait times at Disney World.
On this page you'll find everything you need to know to be able to build your own. You’ll need a 3D printer and a few basic electronic components. Everything I used is linked to below, and further down have included some helpful tips and an FAQ. Enjoy.


List of items used in this project and where to find them / BOM:
- LED Aluminium channels: https://geni.us/LED-Channel-Flat
- LED COB Lights: https://geni.us/COB-LED-24v-White
- LED Dimmer control: https://geni.us/LED-Dimmer-Button
- LED Power Supply: https://geni.us/24v-Power-Supply
- Raspberry Pi: https://geni.us/RaspberryPiV4
- PIR Sensor: https://geni.us/PIR-Sensor
- Memory Card: https://geni.us/Micro-SD
- Pi Power Supply: https://geni.us/PiPowerSupply
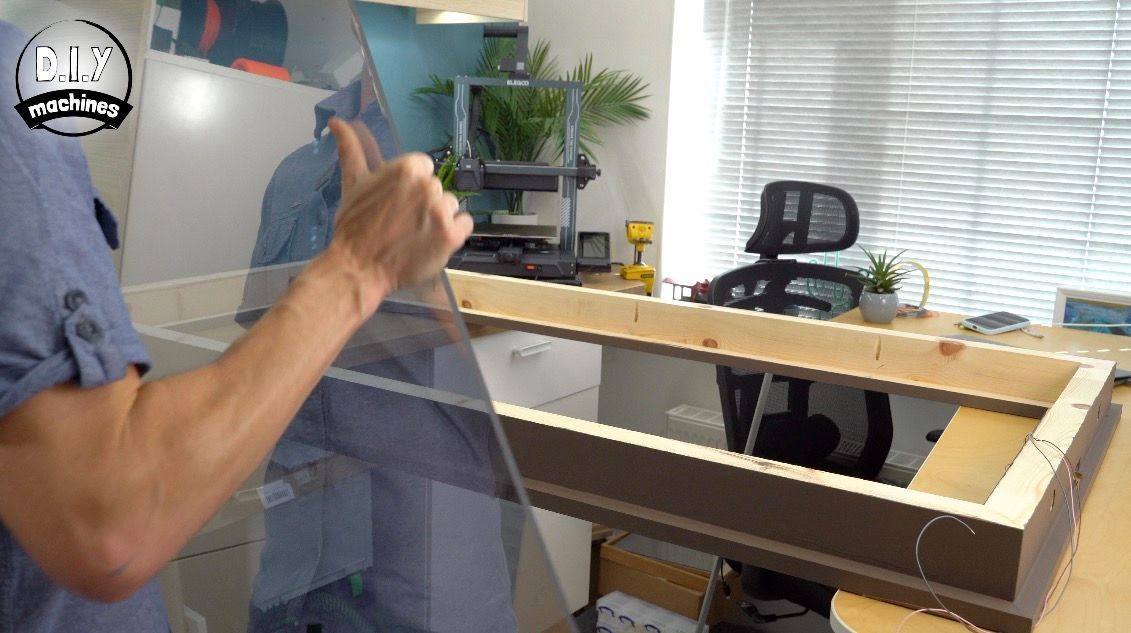
- Acrylic: https://geni.us/AcrylicSheet
- Two-way mirror film: https://geni.us/Two-Way-Mirror-Film
- Monitor:
https://geni.us/Monitor-Screen
Downloads:
Please 'like' the model on Printables. It really helps me out. Thank you.
3D models for printing:
International shipping Etsy shop: www.diymachines.etsy.com
Wood Cutting Calculator
Use the adjacent fields to enter the width of the wood you intend to use of for the front frame and the width of the wood for the rear frame. (Both need to be entered vent if they are the same). Also enter the width and height of you piece of mirror material. All measurements should be in CM. The calculator allows for 2.5cm of overlap in front of the material surface.
(This calculator is provided as is - you should ensure you agree with its results before using them to make cuts).

Community:
Discord server for this project: https://discord.gg/dPy4ArAebn (A great place for questions and advice).
There is a comments section at the end of this page where you can also engage with other makers. However I do find the Discord community more active. :)
Wiring Diagram:
You will need to connect power to your Raspberry Pi as well as your choice of HDMI monitor. If you are using a PIR sensor breakout board then the wires should be connected as shown below. The length of these wires will depend on the distance between where you will install your Raspberry Pi and the top of the frame where the PIR in installed.

Preparing and configuring the Magic Mirror Software & Raspberry Pi
I am currently completing this guide and should have it fully written by the end of this weekend. (End of September) Thank you for bearing with me.
The following steps explain step-by-step how to install the software for this project
I'll guide you through:
- Flashing the Raspberry Pi OS onto the SD card
- Configure it heedlessly to connect to wifi and accept SSH connections
- Install Magic Mirror
- Install and configure modules
- Set it up to start the software automatically after it boots
- Set the screen to switch on and off when motion is detected
Installing and configuring Raspbian / Pi OS on to your SD card
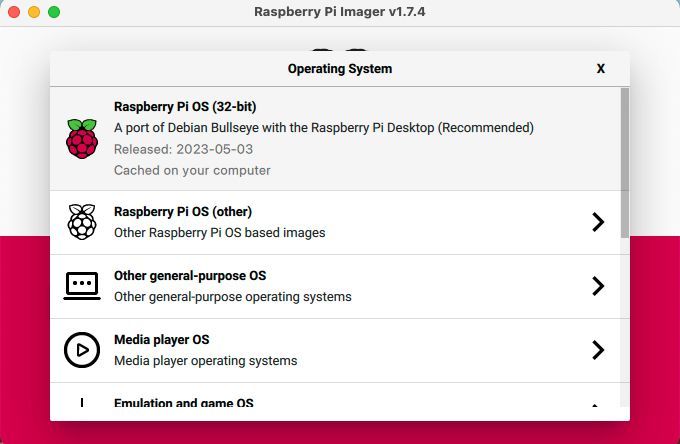
To begin with you will need to download the Raspberry Pi Imager from the foundations website: https://www.raspberrypi.org/downloads/
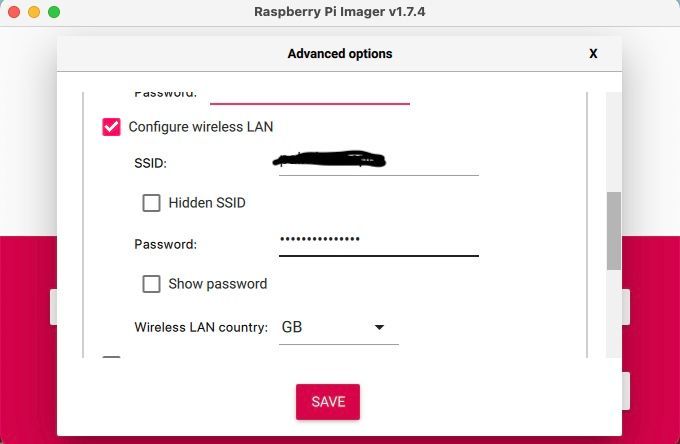
Once you have downloaded and installed the software you can insert your Micro SD card into your PC and select 'Choose OS' followed by 'Raspberry Pi OS (32 bit)'.
After this choose your Micro SD card (be sure to select the correct drive if you have more than one connected as it will be formatted).


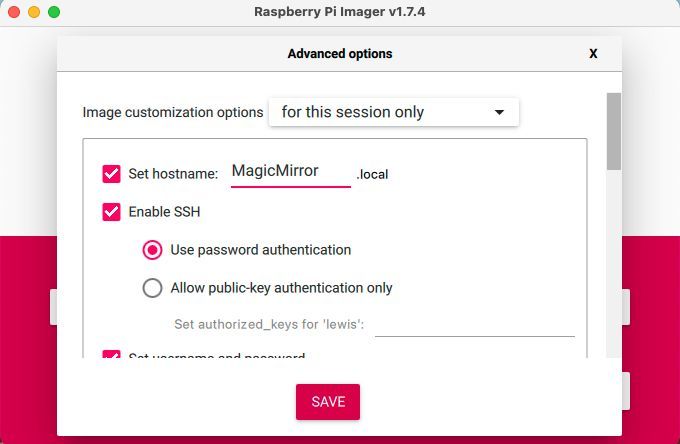
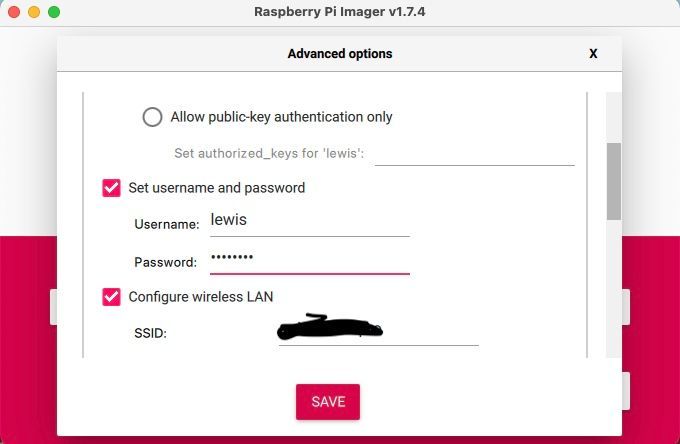
After selecting the correct storage media for flashing click on the cog icon so that we may pre-save some settings. You'll want to:
- set the 'Hostname' to something useful such as 'MagicMirror'.
- Enable SSH (this will let us connect to it remotely later).
- Set a username and password for login into the Raspberry Pi OS.
- Pre-fill the wifi credentials for the network you want you Magic Mirror to connect to.
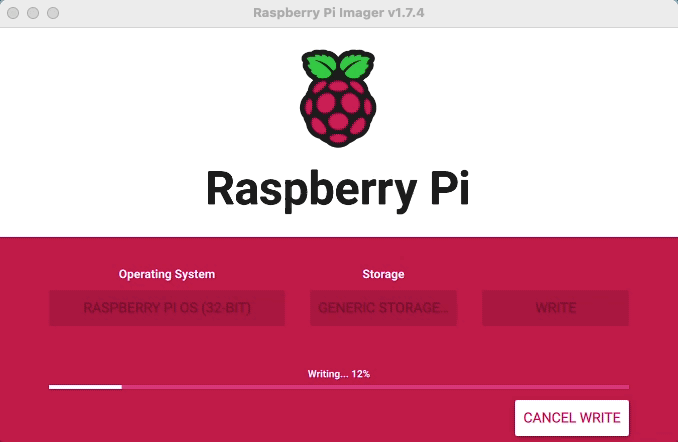
With these details pre-set you can begin the writing process to the SD card. Your computer may require to authorise the Raspberry Pi Imager software so that it has the ability to format the memory card.
This might take a few minutes and you should let to imaging software verify the write process was successful. After this is complete you will be notified. The micro SD card can then be removed and fitted into the Raspberry Pi.
At this point, if you want to, you can connect the HDMI display.
Connect the power and give the Pi a few minutes to complete the first boot and connect to your wifi network. We now have a few ways to find the IP address of your Pi...
If you have a monitor connected
Temporarily connect a USB keyboard and mouse (wired or wireless is fine). After logging in (if you are not logged in automatically at boot) you can hover your mouse over the networking icon in the top right of the window. The icon is made up of two adjacent light blue arrows, one pointing up and the other down.
Using your routers IP tables:
When you use a microSD card loaded with the OS and preconfigure your wifi credentials, automatic allotment of an IP to the Raspberry Pi takes place. The router's DHCP is the one that allots and records these assigned IP addresses. The details are available in the router's address table.
The method for accessing this table varies by brand. As an example, on my Google Wifi network I can use the Google Home App, tap 'Wifi' and then 'Devices' to see a list of currently connected devices and their respective IP addresses.
Identifying which one is the Pi's IP address is easy. This is because when pre-configuring the Raspberry Pi OS we chose a 'Hostname" ('MagicMirror' in my case).
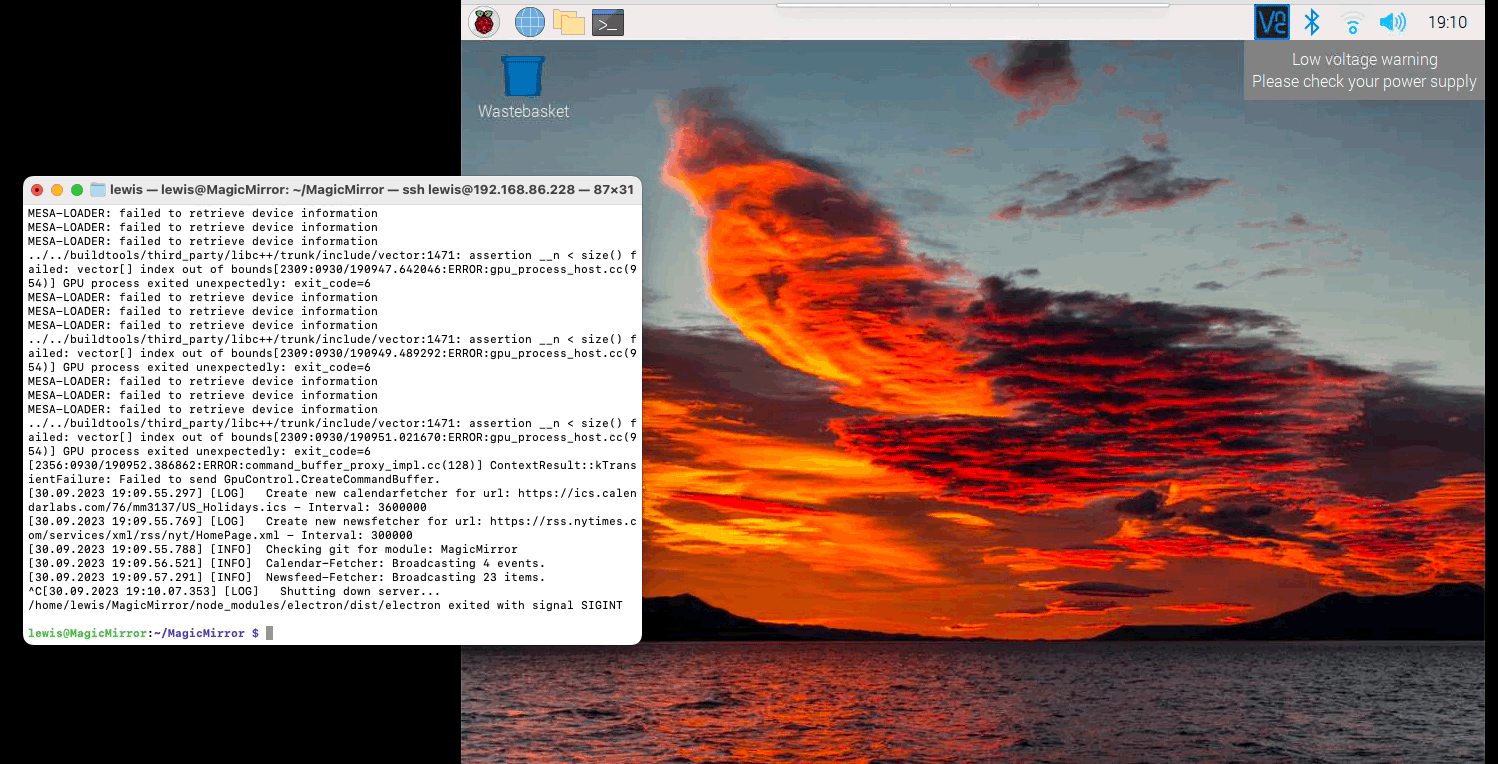
Connect to the Pi
Now we now the Pi's IP address we can connect to it via SSH and then begin issuing commands. From a Windows PC you'll need to open a command prompt (this works on Windows 10 and 11) and on Mac open a Terminal window. Now enter the following:
ssh lewis@192.168.86.228
Substituting 'lewis' for the username you specified when installing Raspberry Pi OS, and the IP address with the correct one you identified for your Pi in the previous step. You will then be prompted for your password - don't worry if you see nothin when typing, just carry on.
Installing Magic Mirror
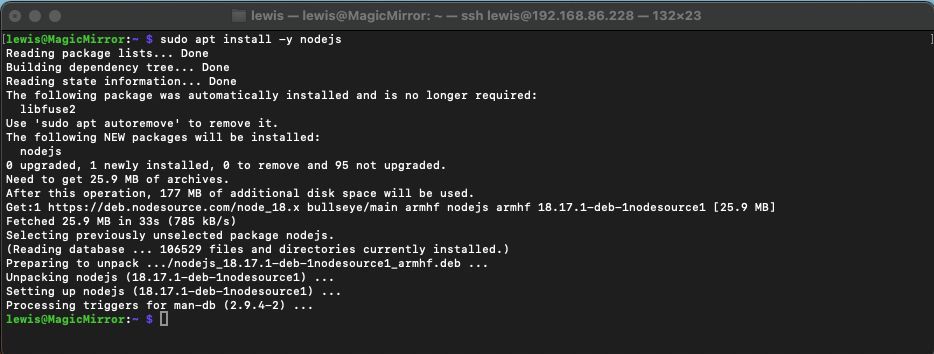
First step is to ensure we have the latest version of Node.js. We can download it with the following command:
curl -sL https://deb.nodesource.com/setup_18.x | sudo -E bash -
followed by the below command to install it:
sudo apt install -y nodejs
This will take a couple of minutes depending on your Raspberry Pi and the internet connection. It will have completed when you are returned to the command prompt.
Next we will clone the repository for the open source Magic Mirror software:
git clone https://github.com/MichMich/MagicMirror
Move to folder for the repository we just downloaded:
cd MagicMirror/
and then install the application:
npm run install-mm
This step can take some time to complete (perhaps anywhere between 10 minutes up to 30 minutes depending on the processing power of your Pi). Treat yourself to a short break and enjoy a cup of tea. Once it has completed we can make a copy of config file and then run the magic mirror in its default configuration to check everything is working so far. Run the following commands:
cp config/config.js.sample config/config.js
npm run start
Configuring default modules
The Magic Mirror Software (MMS) comes with several pre-installed modules. They are as follows:
- Clock
- Calendar
- Weather
- News Feed
- Compliments
- Hello World (used to display static text on the mirror)
- Alert (displays notifications from other modules)
You can find out more specifics for these modules on the MMS documentation pages.
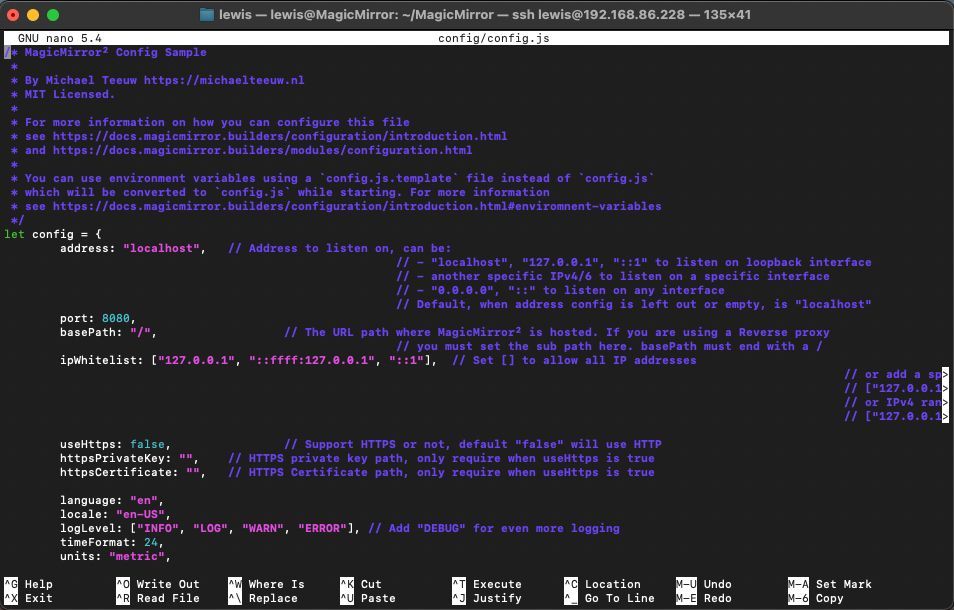
Magic Mirror modules are configured in the
config/config.js
file. You can use a text editor or code editor to edit this file. To open it in using the 'Nano' text base editor you can type:
sudo nano config/config.js
If you've not used the Nano editor before don't worry. Nano is a simple and beginner-friendly text editor commonly found on Unix-based systems. Here are a few simple tips and commands:
Navigating the Text:
- Use the arrow keys (up, down, left, right) to move the cursor around the text.
- You can also use the Page Up and Page Down keys to navigate larger portions of the text.
- To move directly to the beginning or end of a line, use the
Ctrl+AandCtrl+Eshortcuts, respectively.
Editing Text:
- Simply start typing to insert text at the cursor's position.
- Use the Backspace key to delete characters to the left of the cursor.
- To cut/copy and paste text, use the
Ctrl+K,Ctrl+U, andCtrl+Shift+Vshortcuts, respectively.
Saving a File:
- To save your changes, press
Ctrl+O. Nano will ask you to confirm the filename; pressEnterto confirm. If you opened an existing file, it will be overwritten. If it's a new file, you'll be prompted to provide a name.
Exiting Nano:
- To exit Nano, press
Ctrl+X. If you have unsaved changes, Nano will ask if you want to save them. PressYto save orNto discard. Then, Nano will exit.
Search and Replace:
- To search for text within the file, press
Ctrl+W. Enter the search term, and Nano will find and highlight the first occurrence. - To replace text, press
Ctrl+\. Enter the search term, the replacement term, and choose options for case-sensitivity and confirmation.
As you look down through the configuration document you'll see separate sections for each of the modules and within these section will be the various options available and their set values. Any option not mentioned will take the default value as specified in the documentation for that Magic Mirror module.
This page:
https://docs.magicmirror.builders/modules/configuration.html#example on the Magic Mirror documentation pages explains the available options and values. For example, the 'Position' option set's the location of where the module will be loaded onscreen. Just a few of the possible values are top_bar
, top_left
, top_center
, top_right.
Installing and configuring 3rd party modules:
There is an ever growing list of 3rd party modules which is maintained on this page: https://github.com/MichMich/MagicMirror/wiki/3rd-party-modules. Each one is installed an and configured in slightly different but similar ways. As an example I will guide you through installing and configuring the popular NowPlayingOnSpotify module.
(This part of the guide is still being completed - thank you for your patience. Lewis, September 30th 2023)
Comments